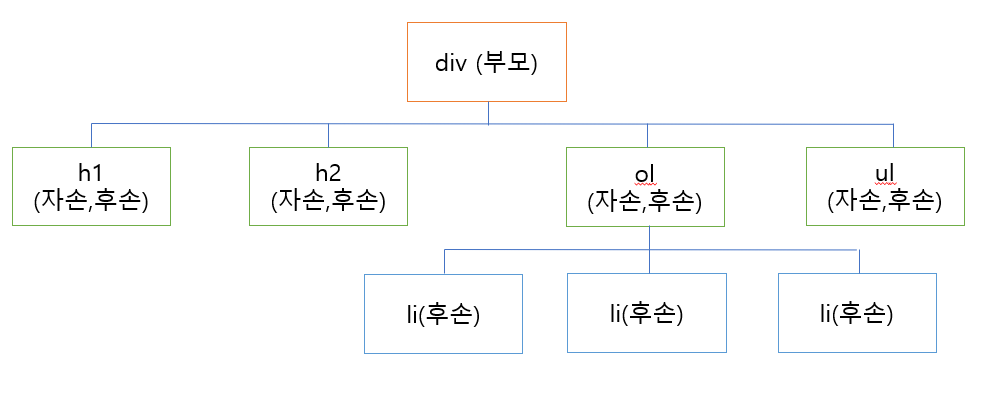
1.자손 선택자 와 후손 선택자(그림)

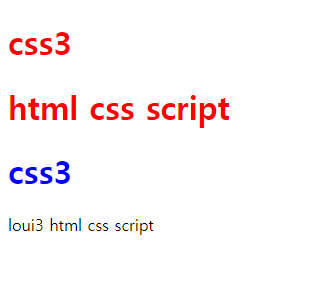
2. 후손 선택자
①후손 선택자는 선택자A의 후손인 B를 선택 하는것으로 (선택자 A 선택자 B)로 나타낸다.
<!DOCTYPE html>
<html>
    <head>
        <title>loui3</title>
        <style>
            #header h1 {color : red;} /*선택자A 선택자B*/
            #section h1 {color : blue;} /*선택자A 선택자B*/
        </style>
    </head>

    <body>
        <div id="header">
            <h1 class="title">css3</h1>
            <div id="nav">
                <h1>html css script</h1>
            </div>
        </div>
        <div id="section">
            <h1 class="title">css3</h1>
            <p>loui3 html css script</p>
        </div>
    </body>
</html>
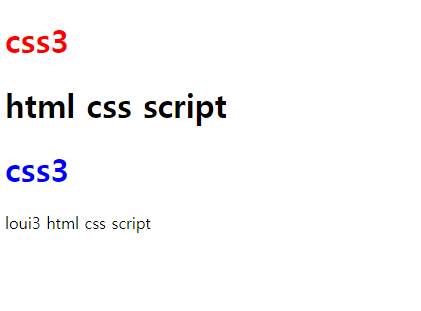
3.자손선택자
①자손 선택자는 선택자A의 자손인 선택자 B를 선택 하는것이고 선택자 (A >선택자B) 로 나타낸다
<!DOCTYPE html>
<html>
    <head>
        <title>loui3</title>
        <style>
            #header > h1 {color : red;} /*선택자A > 선택자B*/
            #section > h1 {color : blue;} /*선택자A > 선택자B*/
        </style>
    </head>

    <body>
        <div id="header">
            <h1 class="title">css3</h1>
            <div id="nav">
                <h1>html css script</h1>
            </div>
        </div>
        <div id="section">
            <h1 class="title">css3</h1>
            <p>loui3 html css script</p>
        </div>
    </body>
</html>
②자손선택자와 table
table 태그 내부에 있는 태그를 자손선택자로 선택을 할경우 아래와 같이 하면 파란색 색깔이 th태그에 적용이 안된다.
<!-- 아래와 같이 하면 안된다 -->
<style>
table > tr > th {
	color: blue;
    }
</style>
그 이유는 웹브라우저에서 tbody 태그를 자동으로 추가 해 table > tr > th 가 아닌 table > tbody > tr > th 로 입력해야 된다.
<!--올바른 예시-->
<style>
table > tbody > tr > th {
	color: blue;
    }
</style>
4.반응 선택자
① 반응 선택자는 사용자의 반응으로 생성되는 특정한 상태를 선택한다.
1. :active - 사용자가 마우스로 클린한 태그를 선택한다.
2. :hover - 사용자가 마우스 커서를 올린 태그를 선택한다.
<!DOCTYPE html>
<html>
    <head>
        <title>loui3</title>
        <style>
            h1:hover {color : red;}
            h1:active { color: blue;}
        </style>
    </head>
    <body>
        <h1>반응</h1>
    </body>
</html>
실행시 반응이란 글자는 검은색이고, 글자 위에 커서를 올리면 빨간색, 클릭하면 파란색으로 변한다.
5.상태 선택자
①상태 선택자는 입력 양식의 상태를 설정할때 사용한다.
1. :checked -체크 상태의 iput 태그를 선택한다
2. :focus -포커스를 맞춘 input 태그를 선택한다.
3. :enabled -사용 가능한 input 태그를 선택한다.
4. :disabled -사용 불가능한 input 태그를 선택한다.
<!DOCTYPE html>
<html>
    <head>
        <title>
            loui3
        </title>
        <style>
            input:enabled {background-color:white;}
            input:disabled {background-color: brown;}
            input:focus {background-color: green;}
        </style>
    </head>
    <body>
        <h2>입력 가능</h1>
        <input>
        <h2>입력 불가능</h2>
        <input disabled="disabled">
    </body>
</html>
6.구조 선택자
① 특정한 위치에 있는 태그를 선택할 때 사용한다.
1. :first-child - 첫번째로 등장하는 태그
2. :last-child -마지막으로 등장하는 태그
3. :nth-child(수열) -앞에서 수열번째로 등장하는 태그
4. :nth-last-child(수열) - 뒤에서 수열번째로 등장하는 태그
<!DOCTYPE html>
<html>
    <head>
        <title>css3</title>
    </head>
    <style>
        ul { overflow: hidden;}
        li {
            list-style: none;
            float:left; padding: 15px;
        }
        li:first-child { border-radius: 10px 0 0 10px; } /*border-radus는 테두리를 둥글게 할때 쓴다고 생각하면 된다.*/
        li:last-child { border-radius: 0 10px 10px 0;}

        li:nth-child(2n) { background-color: aqua;} /*짝수*/
        li:nth-child(2n+1) {background-color: blanchedalmond;} /*홀수*/
    </style>
    <body>
        <ul>
            <li>1</li>
            <li>2</li>
            <li>3</li>
            <li>4</li>
            <li>5</li>
            <li>6</li>
            <li>7</li>
        </ul>
    </body>
</html>
'WEB > CSS3' 카테고리의 다른 글
| 04-01. 레이아웃 (0) | 2022.12.19 |
|---|---|
| 03-02. 위치 속성 (0) | 2022.12.18 |
| 03-01. 글꼴 (0) | 2022.12.16 |
| 02-01. CSS 속성들과 배경 (0) | 2022.12.15 |
| 01-01. CSS 선택자 (0) | 2022.12.12 |


