DTO란?
DTO는 <form> 태그에 실어 보낸 데이터를 서버의 컨트롤러가 객체에 담아 받는데 이때의 객체를 말합니다.
DTO로 받은 데이터는 데이터베이스에 저장됩니다.
form 태그에 대해서는 아래 글을 참고 해주세요.
(action 과 method에 관한글이 적혀 있습니다.)
[HTML5] 간단한 입력 양식을 만들어보자
입력양식 사용자에게 정보를 입력받고 싶을때 사용합니다. 쓰는 방법으로 태그로 영역을 생성하고 안에 태그를 넣으면 됩니다. form 태그 태그에서 method 속성으로 데이터를 전달하고 action 속성
loui3.tistory.com
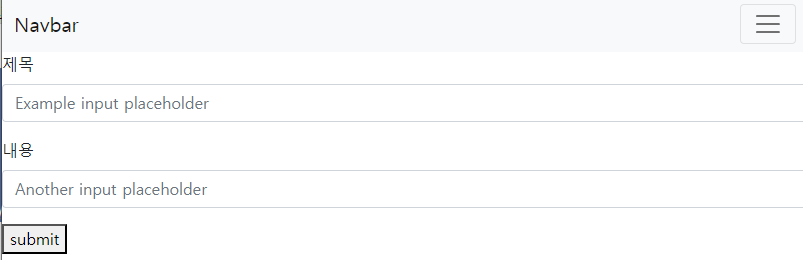
입력 form 만들기
부트스트랩을 이용해 입력 form을 만들겠습니다.
생성은 new.mustache 파일에 해주겠습니다.
{{>layouts/header}}

<form action="/articles/create" method="post">
    <div class="mb-3">
        <label for="formGroupExampleInput" class="form-label">제목</label>
        <input type="text" class="form-control" placeholder="Example input placeholder">
    </div>
    <div class="mb-3">
        <label for="formGroupExampleInput2" class="form-label">내용</label>
        <input type="textarea" class="form-control" placeholder="Another input placeholder">
    </div>
    <button type="submit">submit</button>
</form>

{{>layouts/footer}}
컨트롤러 만들기
입력 form을 웹브라우저에서 보기 위해 컨트롤러를 생성해주겠습니다.
반환값으로 뷰페이지의 이름을 주고, URL 요청을 접수하기 위해 @GetMapping을 사용해줍니다.
package com.example.firstproject.controller;

import org.springframework.stereotype.Controller;
import org.springframework.web.bind.annotation.GetMapping;

@Controller
public class ArticleController {
    @Autowired
    private ArticleRepository articleRepository;

    @GetMapping("/articles/new")
    public String newArticleForm() {
        return "articles/new";
    }
 }
그 다음 페이지에 접속해주시면 잘 생성된것을 확인할수 있습니다.
페이지 주소 --> http://localhost:8080/articles/new
tip) 코드
머스테치 코드가 바뀔때는 망치 아이콘을 누르시고 빌드하셔도 됩니다.
자바 코드가 바뀔때는 서버를 재시작 해주셔야 합니다.
폼 데이터 받기
서버의 컨트롤러가 데이터를 받을수 있게 해주겠습니다.
url 요청을 접수받기 위해 url 주소를 써주시면 됩니다.
@Controller
public class ArticleController {
    @Autowired
    private ArticleRepository articleRepository;

    @GetMapping("/articles/new")
    public String newArticleForm() {
        return "articles/new";
    }

    @PostMapping("/articles/create")
    public String createArticle() {
    	return "";
    }
}
DTO 만들기
폼 데이터를 받아올수 있게 DTO을 만들겠습니다.
DTO를 만들기 위해 firstproject에서 패키지를 만들것이며 패키지 이름은 dto로 하겠습니다.
그 후 클래스 이름이 ArticleForm이라는 자바 클래스를 만들어 주겠습니다.
입력폼에서 제목과 내용을 전송하므로 필드 2개를 만들어 주겠습니다.
package com.example.firstproject.controller.dto;

public class ArticleForm {
    private String title;
    private String content;
}
필드 2개를 만들었으면 생성자를 추가해주겠습니다.
content 필드 다음 행에서 마우스 오른쪽 버튼을 누르신후 Generate를 눌러줍니다.
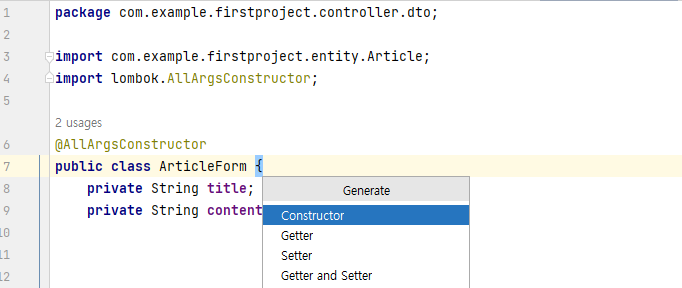
그 다음 Constructor를 눌러 주시고 아래 두개를 모두 선택하신 다음 ok 버튼을 눌러주시면 됩니다.

폼 데이터를 DTO에 담기
전송받은 폼 데이터를 DTO에 담기 위해 ArticleController로 가서 코드를 수정해줍니다.
 @PostMapping("/articles/create")
    public String createArticle(이부분) {
이부분만 수정해주시면 됩니다.
 @PostMapping("/articles/create")
    public String createArticle(ArticleForm form) {
입력 폼과 DTO 필드 연결하기
앞에서 만들어준 new.mustahe 입력폼에 필드명을 넣어주시면 됩니다.
각각 title 과 content로 해주었으므로 코드를 수정하겠습니다.
{{>layouts/header}}

<form action="/articles/create" method="post">
    <div class="mb-3">
        <label for="formGroupExampleInput" class="form-label">제목</label>
        <input type="text" class="form-control" placeholder="Example input placeholder" name ="title">
    </div>
    <div class="mb-3">
        <label for="formGroupExampleInput2" class="form-label">내용</label>
        <input type="textarea" class="form-control" placeholder="Another input placeholder" name="content">
    </div>
    <button type="submit">submit</button>
</form>

{{>layouts/footer}}
'Back-End > Springboot' 카테고리의 다른 글
| 스프링부트 & 자바 - findAll() 메서드 오류 해결 방법 (0) | 2023.10.29 |
|---|---|
| 스프링부트 war파일 만들기 (2) | 2023.09.24 |
| 스프링 부트 '모델'로 템플릿 활용하기 (0) | 2023.08.29 |
| MVC 패턴대로 뷰 템플릿 페이지 만들기 (0) | 2023.08.07 |
| 스프링 부트에서 hello.html 파일 만들기 (0) | 2023.08.07 |


